
That’s your first steps with Foxtrackr for developing your own integration based on our API. This page will help you finding the right way for getting start with the Foxtrackr API.
Different Type of integration
There are two different ways to integrate with Foxtrackr:
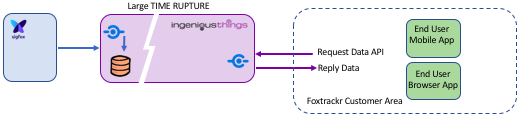
- The PULL api : In this implementation model you do not need to store the Foxtrackr data on your side. You only design a front-end or mobile application and you access the data from our API. In this approach you do not really need to have a backend infrastructure.
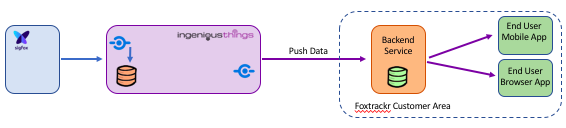
- The PUSH api : in the implementation model you receive a trigger every time a new information has been pushed by one of your devices. You will select and store the information you need into your own backend solution. Then your front-end application will get the Foxtrackr data from you own server.
The two method are not incompatible, for certain operation like the device configuration you need to use the PULL api. You can also choose to store the location in your backend and use the PUSH api for this and in parallel use the PULL api for battery or temperature. This is on your own.
What you must not do is to is a PULL api on regular basis (like every 1 minute) to find new information and fulfill your backend database. For such operations you need to use on of the PUSH solution otherwise your access can be block for abuse.
The Pull Api
From the Pull API you can access to all the various information provided by the tracker but not only. The IngeniousThings (Mother company of Foxtrackr) IoT platform is offering api to manage accounts, devices, group, alarming… all these functions are accessible and can be automated with the API. This helps you to build end-user applications, specific to your use-case with no need of a backend and its associated operations.
The Pull API is split into 2 parts:
- The IoT platform API where you can access endpoint to manage users, groups, devices, sigfox backends… And where your can login.
- The Foxtrackr API where you can access endpoint for all the Fotrackr specific data and actions.
The link above are detailing each of the API endpoint with the model to be used. From these portal you can test online the APIs before implementing your own software.
The fist step is to login on the API to get a JWT (Json Web Token) this is a kind of dynamic API key used for identifying you. It contains you authorization on the API. This token have a duration so it needs to be renewed before ending. this Token will be added then in all the API endpoint in the Authorization field for allowing access.
To obtain your JWT Token, you need to use the /sign/3.0/in endpoint.
The Push Api
The Push Api is not only an API, there are different solution to obtain the data from our servers:
- From the Pull Api you can obtain the list of devices updated since your last call and then request for the different informations for that device. This is basically a Push over Pull Api. This solution is not efficient because you it will need a lot of communication to the status endpoint for not a lot of positive response.
To access the list of updated devices just request the endpoint /devices/3.0/listUpdated/group/-1/ with group replaced by the Base64 group name you want to get devices update status. -1 is used to indicate we want to list updated devices since last call. A timestamp in ms since UTC Epoc can be used instead. This returns a list of DeviceId for being pulled.
- You can assign a callback url for a group of devices. In this case for every data update from one of the devices belonging to this group, the given url will be called with a POST message containing the new information received.
To activate the Http Push, you need to edit your device group (or create a specific one) and set the Url target. Then for each of the device incoming message a Http POST will be performed on this callback Url with the device information details in the body.
The message format is described in the api-doc, in the Model part under name FoxtrackrPushMessage
- You can activate MQTT for a group of devices. This is working the same way as the previous one. But instead of getting a POST, the data will be sent to MQTT channel. Your backend can connect to our MQTT server to receive the informations. This is our favorite integration way as this solution is reliable: it stores the information until you get them.
To activate MQTT, you need to edit your device group (or create a specific one) and switch this option on. The message format is the same as for HTTP Post but you filter your subscription based on topics.
The topic format is the following : foxtrackr/{device_id}/3.0/{message_type}
To subscribe to the topic, you need to request a user account on our MQTT infrastructure by contacting us.
To access the MQTT Service, you can get more details on the Foxtrackr MQTT page.
Next steps
Before starting your code, we recommend you to see the platform main development concepts about right management, group management…